This blog post was inspired by some chat over on the Game Audio Slack channel – a question was asked relating to the best place to put the Audio Listener for a third person style game / character. In fact this is relevant to any game that is not a first person perspective (eg. side scrolling platformer) as there is always conflict between the location of the character actor and the camera in terms of what can be heard and where it is panned.
The general consensus seemed to be that there are 4 main options:
- Attached to the camera – using its position for both attenuation and panning
- Attached to the player character – using its position for both attenuation and panning
- Part-way between the player character and the camera – using its position for both attenuation and panning
- Attached to the player – using its position for attenuation, but using the relative rotation of the camera for panning
We’ll look at each one in turn – how to set it up, and what the potential issues are with each one…
I’ve created a very basic map in order to demonstrate how each setup works. I’ve deliberately made the attenuation radii of the 2 sounds in the map very tight in order to illustrate what the potential issues are with each setup.

Camera:
This is the easiest to setup as it’s the default listener position within UE4 – if you do nothing, then the camera will be your listener.
As you can hear in this video, the sounds are not audible until the player character is well past their locations. As the camera moves around (with a static player character) the sounds fade in and out, which can feel a little odd. However, the panning position of the sounds is relative to the camera, so sounds are positioned as they appear on the screen.
Character:
In order to change the Audio Listener Position we need to use the Set Audio Listener Override node within a BP (I’m doing mine within the player character BP, but you can do it anywhere…). I’ve used the Event BeginPlay so that the listener position is set on load, but again, you could do this with any event…
The Target of the Set Audio Listener Override needs to be a Player Controller (unless you do this within a player controller BP – then you can leave it as ‘Self’).
We can attach the Audio Listener to a specific component within the player character – I’ve set up a ‘dummy’ scene component within the BP called “Char Listener Pos” which is positioned at the character’s head (see image below).


As you can hear, the sounds attenuate according to the character position, which feels a bit more natural than the camera-based example. As the camera moves around, the sounds stay in position as the character is still – this can feel a little odd, particularly when the camera moves 180º to face the character, but is OK(ish). The real weirdness starts when the camera is back behind the character and it turns round to face the camera – all of a sudden, the sounds pan across to the opposite side of the stereo field. This feels very odd as the sounds are now panning from the wrong side based on the screen position – there is a mismatch between onscreen location and spatial location.
Part-way:
There are two ways we could do this method. The first would involve calculating the offset (as a vector) that we would want the listener to be from the player character and using the Location input of the Set Audio Listener Override node using a single event (eg. BeginPlay). While this would work for a fixed camera, if the camera can move around freely (which is often the case) the relative offset would change if the camera moves closer to or further away from the character (eg. to avoid a collision with an object in the world).
Another method would be to not attach the listener to a specific component, and instead set it’s actual location in the world continuously (eg. by using the Tick event). This will take into account any changes of relative position between the camera and the character and ensure that listener is always in the same relative position no matter what either the character or camera do.
To calculate the position of the listener we could do this:
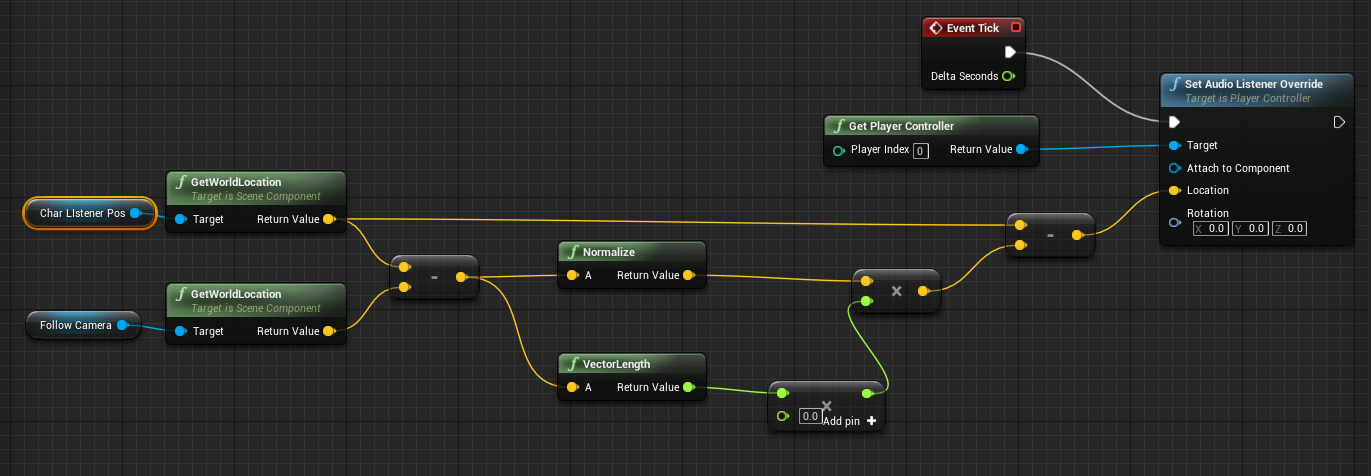
Subtracting the two locations and normalizing them gives us a direction from the character to the camera. We can also use the VectorLength node to give us the distance between the two locations which we can then scale in order to find any point between the two locations. We then subtract this from the initial character location to create a location for our listener.
In this video I’ve set the listener position to be half way between the character and the camera to make it obvious. As you can hear, the attenuation is a compromise between character and camera locations, which kind of works. As with the earlier camera-based example, the panning position of the sounds is relative to the camera, so sounds are positioned as they appear on the screen.
Character for attenuation / camera for panning:
This method requires constant updating (eg. by using the Tick event) in order to calculate the rotation of the camera relative to the character. We’re not going to attach the listener to the character as this can cause problems with the panning of sounds. Instead we’ll simply get the location of the Char Listener Pos component and set the listener to the same position. In order to calculate the rotation value so that the listener rotates according to the camera position relative to the character, we use the Find Look at Rotation node, and use the camera as the Start location, and the character as the Target location.

As you can hear, the sounds attenuate according to the character’s position which works. As the camera moves around, the sounds pan according to the camera movement so that they are positioned as they appear on the screen.
Best of both worlds (Downloadable Macro):
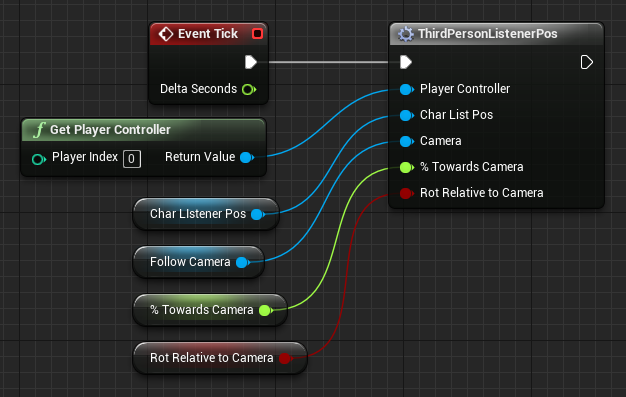
In order to make setting up the listener position as easy as possible, and to allow for experimentation, I’ve created a macro that can be dropped in to the player character BP.
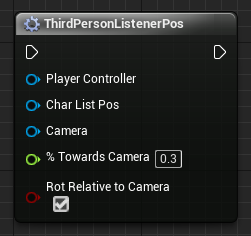
You define the player controller, the character listener position, the camera position, how far you want the listener positioned between the two (0.0 – 1.0), and whether you want to rotate the listener based on the camera or not.
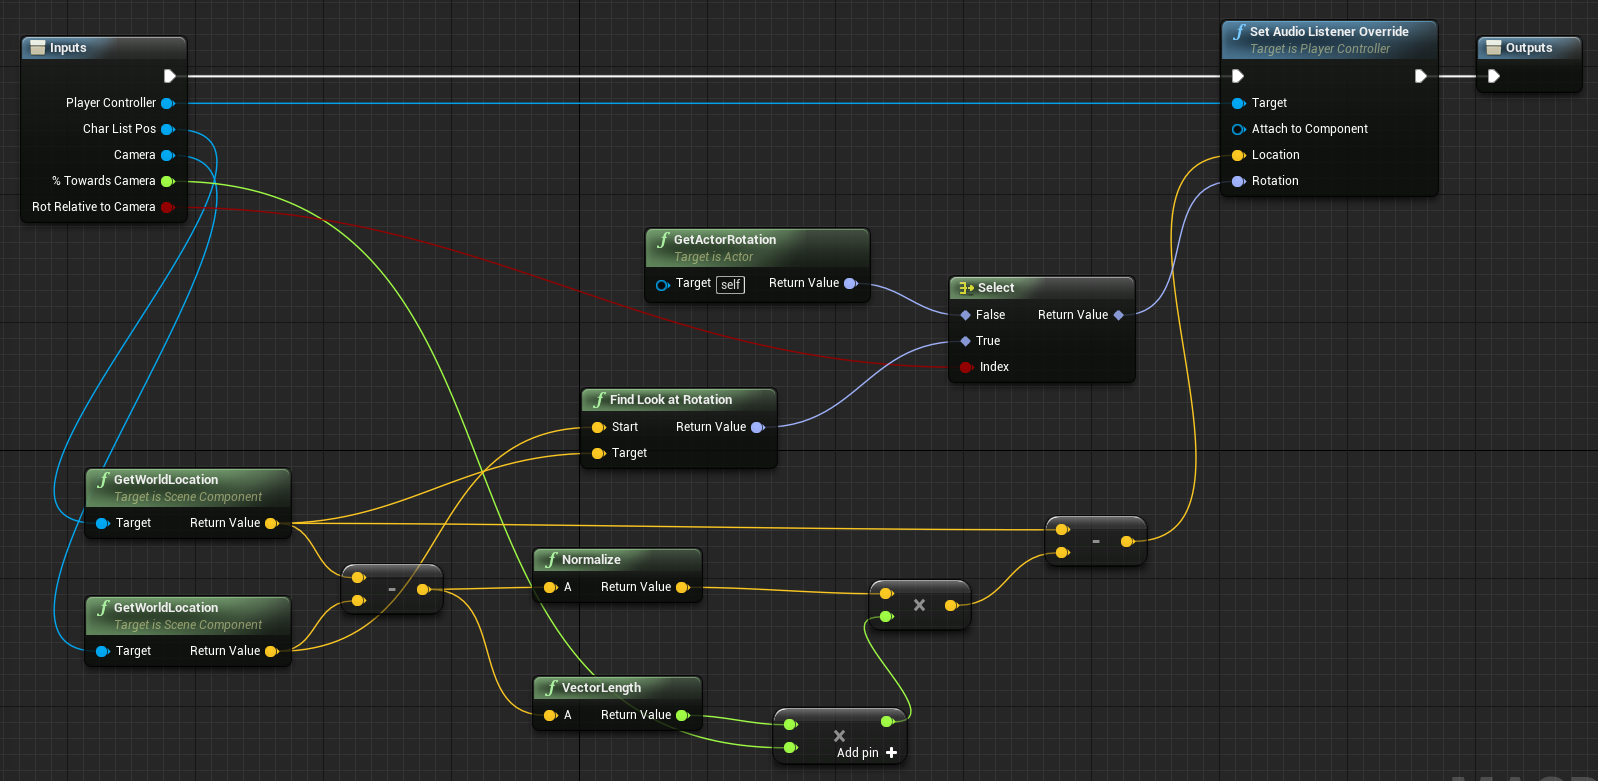
As you can see, it combines the various approaches we’ve covered into one macro, and so will require continuous updating.
The advantage of this macro is that you can use editable variables for the % Towards Camera and Rot Relative to Camera properties, which means you can quickly and easily experiment with different settings via the player character’s Details.
It also means that if you wanted to, you could vary these properties during the game based on events or variables…
The macro can be downloaded from here
Hopefully you’ll find it useful – as always feel free to get in touch with any comments…

this is great – thanks for sharing !
LikeLiked by 1 person
What happens when the fire is between the player and the camera? Doesn’t it jump from the front speakers to the surrounds?
LikeLike
Hi Jed, tbh I haven’t tested this in surround – I was only using stereo headphones at the time. I would imagine that it depends on the rotation of the listener / character… There shouldn’t be any ‘jumps’ as the listener position moves with the camera / character and so if sound is moved to be between the player and camera, then it should move within the surround field as well (rather than suddenly jump).
LikeLike
This is a common problem to all games including AAA titles. If your listener is within your character, the sound will jump from one to the other of your headphones (similar but less obvious in stereo or 5.1 speakers) if the emitter gets close enough. Using a camera listener will minimize the problem because stuff goes through the camera less often. Another way is to set a spread attenuation to the sound so that it spread out to all your speakers as it get close. The biggest problem happens when the subobjects attached to the main character shake around the player, or when the listener position does not update simultaneously.
LikeLike
Great Works. Thanks.
LikeLike
How did you add the “CharListnerPos” Component,
I don’t see it no matter how much I look for it.
*Attach files
https://drive.google.com/file/d/1F82LnD_8TcwgMhJbWGcq4oa6ouw4e5qa/view?usp=sharing
LikeLike
It’s just a scene component that I’ve called CharListenerPos – search the add component menu for “scene” and you’ll find it.
LikeLiked by 1 person
Thank you for your response.
LikeLike
Any idea how to add this node in BP?
*Attach files
https://drive.google.com/file/d/17D8GIvJVcfG0hNJQ4bZq4tXpz31U3DJM/view?usp=sharing
LikeLike
You can drag off the inputs to the macro and “Promote To Variable”
LikeLiked by 1 person
I tried it as per your answer.
Thanks to you, I solved it.
Thank you.
LikeLike